FortiOS 8.0 firmware analysis & rootfs decryption
I. Introduction
In today’s network security industry, Fortinet solutions (in particular, the FortiGate line) hold one of the leading positions. They are widely used both in the enterprise segment and in critical infrastructure. However, incident statistics show that these devices regularly become targets of attacks, often exploiting 0-day vulnerabilities. This fuels community interest in independent security auditing and vulnerability research in the firmware of these devices.
A key step in any vulnerability research effort is obtaining access to the device’s filesystem. However, in recent Fortinet firmware versions, the file representing the filesystem (rootfs) is shipped in encrypted form. Attempts to analyze this file using standard tools or unpacking utilities (for example, binwalk) produce no results in this case.
Since the filesystem image itself contains no information about the encryption method, the only viable analysis vector is its loading mechanism — the Linux kernel. In this article we describe the full research cycle: from preparing the kernel binary for work in a disassembler to recovering the encryption algorithms, bypassing key obfuscation, and implementing a tool to decrypt and unpack the filesystem.
II. Initial Analysis
As the target of our research we chose the FortiOS 8.0 firmware image for KVM virtualization. After unpacking the archive we obtain the disk image file boot.qcow2. This image can be mounted or unpacked (for example, using 7-zip), giving us access to the boot partition.
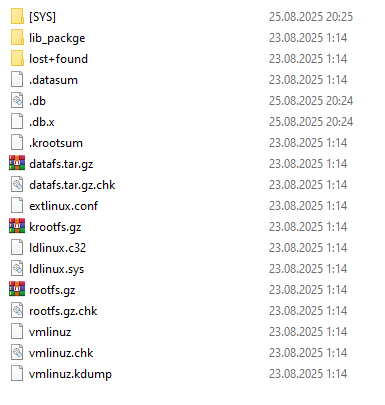
First, we are interested in three key files:
- extlinux.conf — the bootloader configuration file.
- rootfs.gz — the filesystem image.
- vmlinuz — the compressed Linux kernel.
First, let us take a look at extlinux.conf:
DEFAULT vmlinuz ramdisk_size=870400 crashkernel=192M softlockup_panic=0 hung_task_panic=0 initrd=/rootfs.gz tpm_tis.interrupts=0 pcie_aspm=off
The initrd=/rootfs.gz parameter tells the kernel to use this file as the initial RAM filesystem.
Now let us try to identify rootfs.gz with standard utilities. The file command returns an unexpected result:
$ file rootfs.gz
rootfs.gz: OpenPGP Public Key
Identifying a ~150 MB file as an "OpenPGP Public Key" is an obvious false positive, likely caused by matching signatures in the header or by a particular data structure.
Running binwalk to search for embedded filesystems or archives also yields no successful results:
$ binwalk rootfs.gz

DECIMAL       HEXADECIMAL     DESCRIPTION
---------------------------------------------------------------------------
18353219      0x1180C43       MySQL MISAM compressed data file Version 3
58858910      0x3821D9E       mcrypt 2.5 encrypted data, algorithm: "",
                              keysize: 8789 bytes, mode: "B",
The utility only detects random signatures deep inside the file (MySQL, mcrypt), ignoring the beginning. This is a typical picture for encrypted high-entropy data.
If you look at the file contents in a hex editor, you will see nothing but random noise:

As mentioned earlier, the only place we can learn how to decrypt rootfs.gz is the vmlinuz kernel. However, analyzing a “raw” compressed kernel in a disassembler is not the most efficient approach. There is a utility called vmlinux-to-elf that can decompress the kernel, recover function names and sections, and greatly simplify further analysis.
$ vmlinux-to-elf vmlinuz vmlinuz.elf

[+] Kernel successfully decompressed in-memory (the offsets that
    follow will be given relative to the decompressed binary)
[+] Version string: Linux version 6.1.62 (root@2de49d193207) (clang
    version 14.0.6 (https://github.com/llvm/llvm-project.git
    fcd3695c47ca861e38f9098199c92b117b0d9cd9), LLD 14.0.6) # SMP
[+] Guessed architecture: x86_64 successfully in 0.51 seconds
[+] Found kallsyms_token_table at file offset 0x014d79d8
[+] Found kallsyms_token_index at file offset 0x014d7d58
[+] Found kallsyms_markers at file offset 0x014b83a0
[+] Found kallsyms_names at file offset 0x01433b88 (42630 symbols)
[+] Found kallsyms_num_syms at file offset 0x01433b80
[i] Negative offsets overall: 100 %
[i] Null addresses overall: 0 %
[+] Found kallsyms_offsets at file offset 0x0140a160
[+] Successfully wrote the new ELF kernel to vmlinuz1.elf
As a result, we obtain a full-fledged ELF file (vmlinuz.elf) ready to be loaded into a disassembler.
III. Overall Algorithm
After loading the extracted vmlinuz.elf into a disassembler, we can begin the analysis. Based on our experience analyzing previous Fortinet firmware versions, we know that direct filesystem decryption was previously performed in the fgt_verify_decrypt function. Therefore, our first step was to search for this function in the recovered ELF file.
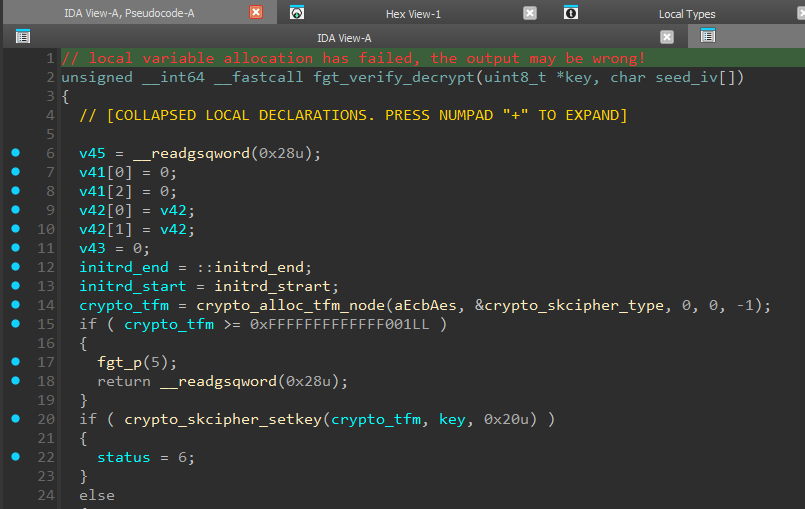
A quick look at fgt_verify_decrypt confirms that it is still responsible for decrypting rootfs. The function takes pointers to Key (the key) and IV (the initialization vector) as arguments. AES in ECB mode is used here (line 14). We will return to a detailed breakdown of this function’s algorithm later (see Section VI). For now, our main task is to understand where the cryptographic keys passed into this function come from.
To do that, let us move to the parent function — fgt_verify_initrd.
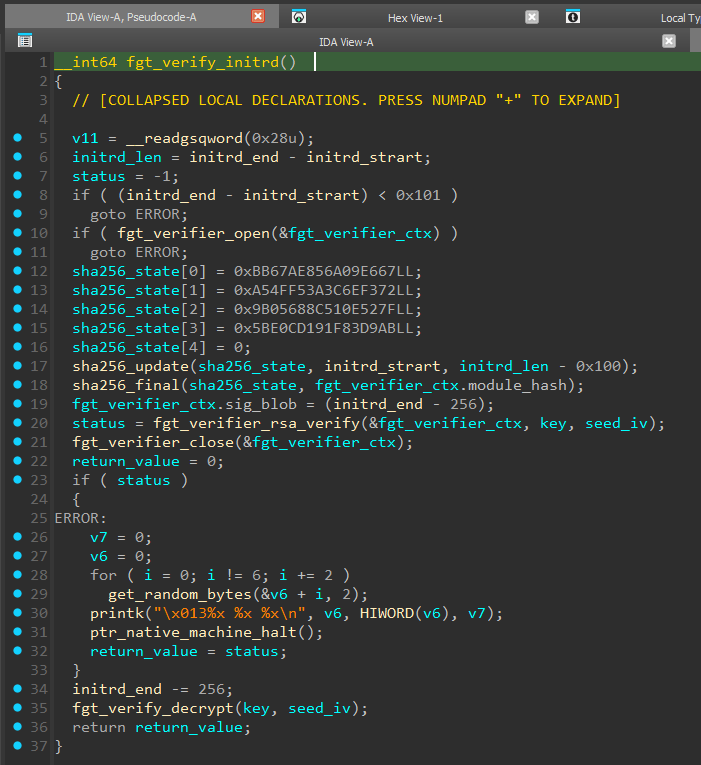
The logic of this function resembles a digital signature check, and if the verification succeeds, it calls fgt_verify_decrypt (line 35).
We can see that the digital signature occupies the last 256 bytes of initrd (and as we learned from extlinux.conf: initrd is the rootfs.gz file). First, a SHA-256 hash is computed over the entire initrd excluding the last 256 bytes (line 17).
The arguments we care about (key and seed_iv), in addition to fgt_verify_decrypt, are also passed into fgt_verifier_rsa_verify (line 20).
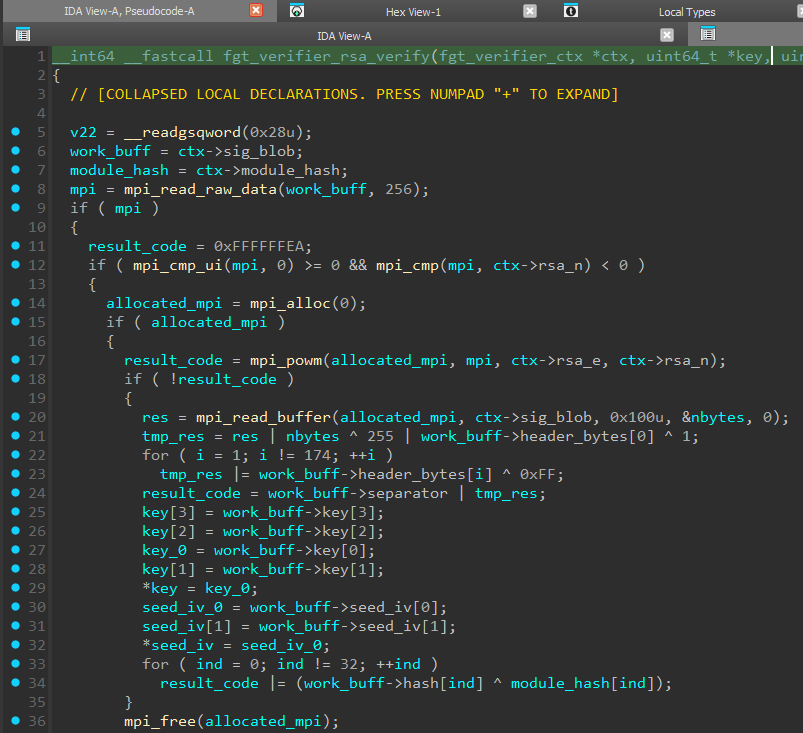
Looking inside fgt_verifier_rsa_verify, we see heavy use of the MPI (Multi-Precision Integers) library, for example the mpi_powm function, which performs modular exponentiation.

Here we can see signature decryption (line 17), validation of the decrypted data structure (lines 20–24), and extraction of keys from the signature. At the end, the previously computed SHA-256 is compared with the data inside the digital signature (lines 33–34).
The function name and algorithm indicate that RSA is used, but we then run into the following problem: to decrypt (verify) the signature we need a public key whose constants are provided via a proprietary structure that we called “fgt_verifier_ctx”
If we look at the pseudocode of fgt_verifier_initrd, we will see that the address of this structure is passed to fgt_verifier_open.
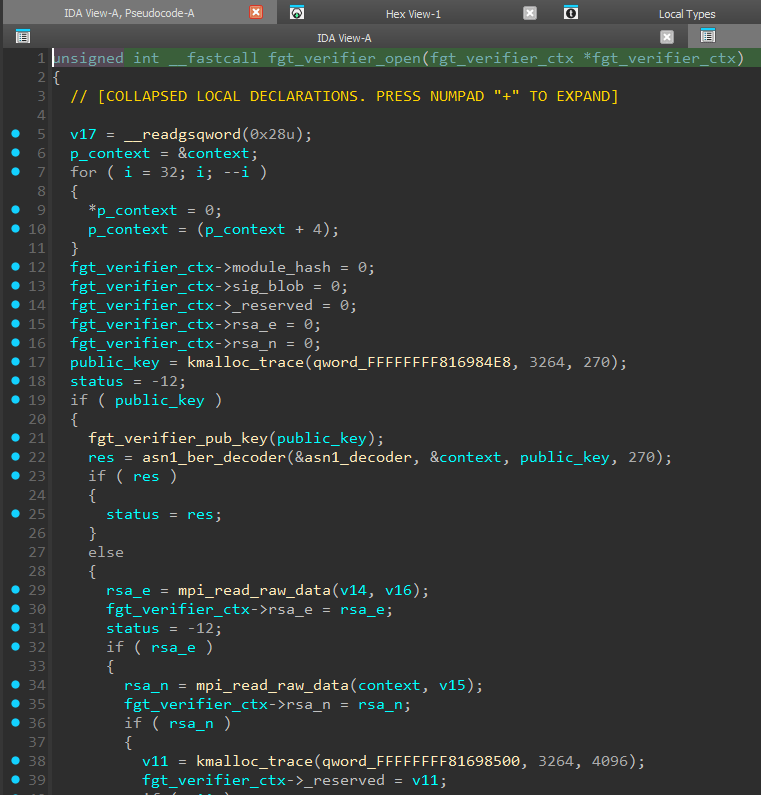
This function acts as a constructor for the fgt_verifier_ctx structure: here we see the initial initialization of structure members (lines 12–16) and assignment of the values we need (lines 30 and 35).
In addition, we see a call to fgt_verifier_pub_key, followed by asn1_ber_decoder. The presence of an ASN.1 decoder is a strong clue: it suggests that the public key we are looking for should be encoded according to X.509 or PKCS (DER/BER format). However, a quick search through strings and constants reveals nothing similar in plaintext. So we proceed to analyze fgt_verifier_pub_key.
IV. Public Key Decryption
The fgt_verifier_pub_key function prepares parameters and decrypts the RSA public key. Based on the debug messages (line 25) and the first argument to crypto_alloc_tfm_node (line 22), we can conclude that the ChaCha20 algorithm is used here.
First, the cipher parameters are prepared — the Key and the Initialization Vector (IV). However, instead of storing explicit values, a 32-byte seed array is used.
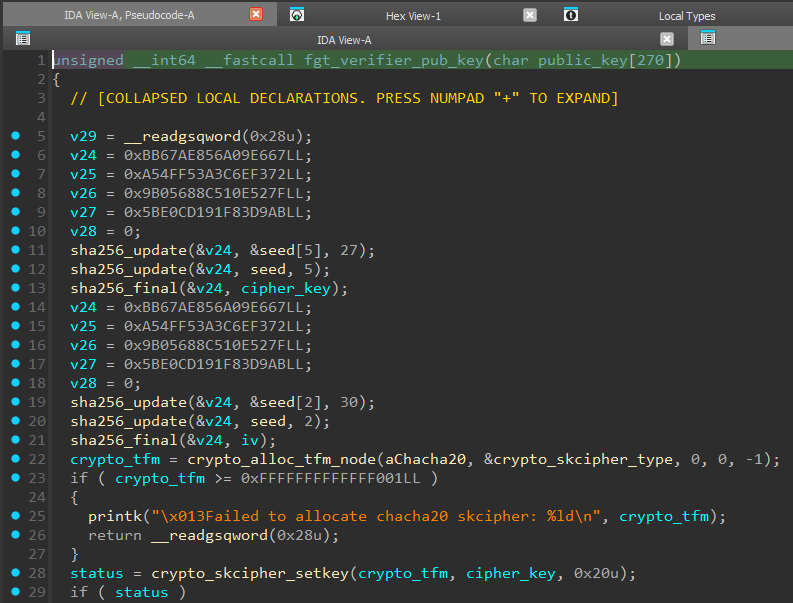
The Cipher Key generation algorithm (lines 11–13) is as follows:
- Take data from the seed array starting at offset 5 (27 bytes).
- Append the first 5 bytes of the seed array.
- Compute the SHA-256 hash of the resulting sequence.
- Use the result as the 256-bit key for the ChaCha20 cipher.
The IV generation algorithm (lines 19–21) is as follows:
- A similar operation is performed with offset 2: take 30 bytes starting from the 2nd byte and append the first 2 bytes of seed.
- The SHA-256 hash of the resulting sequence is used as the IV.
By analyzing the skcipher_request structure, we find the source — the address where the encrypted key is stored (lines 52 and 62) — and learn the length of that key (line 65).
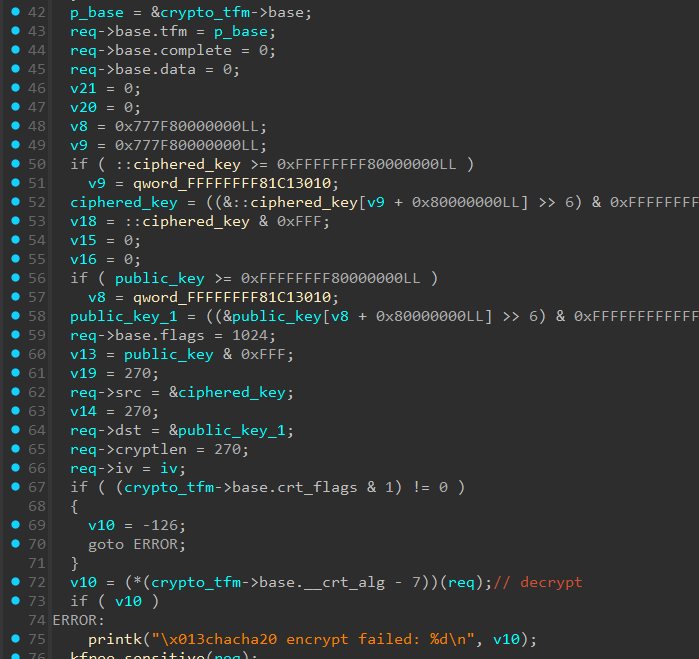
After setting up the encryption context, the encryption routine is invoked (line 72), which transforms the encrypted ciphered_key array into the plaintext public_key.
Having reconstructed this algorithm and extracted the required data from the executable (seed.bin and encrypted_key.bin), we can write a script to decrypt the public key:
import hashlib
import struct
from Crypto.Cipher import ChaCha20


with open("seed.bin", "rb") as f:
   seed_data = f.read(32)
with open("encrypted_key.bin", "rb") as f:
   enc_data = f.read(270)

key_input = seed_data[5:32] + seed_data[0:5]
chacha_key = hashlib.sha256(key_input).digest()

iv_input = seed_data[2:32] + seed_data[0:2]
iv_hash = hashlib.sha256(iv_input).digest()

print(f"Key SHA256: {chacha_key.hex()}")
print(f"IV SHA256:  {iv_hash.hex()}")

kernel_iv = iv_hash[:16]
counter_bytes = kernel_iv[:4]
nonce_bytes = kernel_iv[4:]
counter_val = struct.unpack("<I", counter_bytes)[0]

cipher = ChaCha20.new(key=chacha_key, nonce=nonce_bytes)
cipher.seek(counter_val * 64)
decrypted = cipher.decrypt(enc_data)

with open("decrypted_rsa_pub.der", "wb") as f:
   f.write(decrypted)
The script output is saved to decrypted_rsa_pub.der. Inspecting it confirms that it is a valid ASN.1 (DER) structure containing an RSA-2048 public key.
$ openssl rsa -RSAPublicKey_in -inform DER -in decrypted_rsa_pub.der -text

Public-Key: (2048 bit)
Modulus:
    00:b7:9a:8c:86:fb:ac:f0:1a:bf:a6:8b:8b:74:de:
    c1:87:cb:8d:d7:ea:df:93:cc:81:ce:29:17:21:3f:
    a5:d1:df:7d:68:50:94:fb:3e:e9:b5:ef:e1:b9:b4:
    a2:48:81:6c:cb:f6:17:4b:52:2b:1f:0b:96:98:19:
    60:45:7a:64:47:ae:0a:b3:9d:96:7b:aa:6b:cf:bc:
    59:72:b6:72:f4:27:b0:20:a0:b9:4f:a2:90:6f:2a:
    10:0b:c2:4c:fc:e8:11:b8:a0:de:58:ae:d8:40:cc:
    e4:db:03:9c:44:25:a8:77:bd:0b:93:4d:95:be:06:
    23:a4:5c:63:47:08:d6:f9:fe:a9:56:27:1c:a4:04:
    45:38:d4:68:08:36:44:8e:70:27:6d:b2:15:36:d2:
    34:4a:16:94:1b:51:79:4e:2c:93:4b:10:ef:cf:b4:
    ca:8d:3d:6c:55:93:9e:78:84:bc:82:5f:a0:2f:e5:
    45:b4:eb:a4:28:90:ad:c5:e3:02:40:97:4e:64:33:
    96:37:12:02:15:d1:3c:aa:03:fe:35:5c:65:66:a0:
    51:01:1d:8c:f3:2c:40:58:99:7e:97:33:8a:93:17:
    bf:33:65:8d:57:90:ec:bd:12:cd:b3:68:ca:f2:35:
    fb:4f:f9:f8:4d:51:03:5b:8d:6c:07:21:26:8a:2f:
    f3:01
Exponent: 65537 (0x10001)
writing RSA key
-----BEGIN PUBLIC KEY-----
MIIBIjANBgkqhkiG9w0BAQEFAAOCAQ8AMIIBCgKCAQEAt5qMhvus8Bq/pouLdN7B
h8uN1+rfk8yBzikXIT+l0d99aFCU+z7pte/hubSiSIFsy/YXS1IrHwuWmBlgRXpk
R64Ks52We6prz7xZcrZy9CewIKC5T6KQbyoQC8JM/OgRuKDeWK7YQMzk2wOcRCWo
d70Lk02VvgYjpFxjRwjW+f6pViccpARFONRoCDZEjnAnbbIVNtI0ShaUG1F5TiyT
SxDvz7TKjT1sVZOeeIS8gl+gL+VFtOukKJCtxeMCQJdOZDOWNxICFdE8qgP+NVxl
ZqBRAR2M8yxAWJl+lzOKkxe/M2WNV5DsvRLNs2jK8jX7T/n4TVEDW41sByEmii/z
AQIDAQAB
-----END PUBLIC KEY-----
Now we can proceed to analyzing fgt_verifier_rsa_verify and decrypting the digital signature.
V. RSA-KEM scheme analysis and key extraction
Analyzing the pseudocode of fgt_verifier_rsa_verify shows that it implements not only signature verification, but also a key encapsulation mechanism (KEM — Key Encapsulation Mechanism).
The code performs a “raw” RSA decryption operation using the mpi_powm function. The result is a 256-byte data block.
The most interesting part is the structure of this decrypted block. Standard libraries (for example, OpenSSL or PyCryptodome) expect to find an ASN.1 structure with a hash-algorithm identifier (OID) when verifying a signature. Fortinet, however, uses this container to securely transport cryptographic key material required to decrypt the main file.
The structure of the decrypted block is as follows:

- Padding (PKCS#1 v1.5): The block starts with the standard 0x00 0x01 header, followed by 0xFF padding bytes and the 0x00 delimiter byte.
- Cryptographic Key Material: Immediately after the delimiter are the values required to decrypt rootfs:
- AES IV: a 16-byte initialization vector.
- AES Key: a 32-byte encryption key.
- Hash: The block ends with a 32-byte SHA-256 hash computed over the encrypted rootfs payload.
There is an important nuance here: because Fortinet uses its own scheme for storing key material (Key Material instead of ASN.1), standard cryptographic libraries cannot process this container. They successfully parse the Padding, but cannot interpret the contents.
To extract the key material, we need to implement “manual” processing of the RSA block: perform the mathematical operation, validate the Padding, and extract the data at fixed offsets.
import hashlib
from Crypto.PublicKey import RSA
from Crypto.Util.number import bytes_to_long, long_to_bytes


with open("decrypted_rsa_pub.der", "rb") as f:
   pub_key_der = f.read()
   rsa_key = RSA.importKey(pub_key_der)
with open("rootfs.gz", "rb") as f:
   data = f.read()
   rootfs_data = data[:-256]
   signature = data[-256:]

# Raw RSA Decrypting
sig_int = bytes_to_long(signature)
decrypted_int = pow(sig_int, rsa_key.e, rsa_key.n)
decrypted_bytes = long_to_bytes(decrypted_int)

# Check PKCS#1 v1.5 padding
if decrypted_bytes[0] != 0x01:
   print(f"[FAIL] decrypted_bytes[0]: {decrypted_bytes[:5].hex()}")
   exit()

if decrypted_bytes[0xAE] != 0x00:
   print(f"[FAIL] decrypted_bytes[0xAE]: {hex(decrypted_bytes[0xAE])}")
   exit()

# Get key material
payload_iv = decrypted_bytes[0xAF: 0xAF + 16]
payload_key = decrypted_bytes[0xBF: 0xBF + 32]
embedded_hash = decrypted_bytes[0xDF: 0xDF + 32]

print("-" * 40)
print(f"PAYLOAD KEY (Hex): {payload_key.hex()}")
print(f"PAYLOAD IV  (Hex): {payload_iv.hex()}")
print("-" * 40)
print(f"SHA256 Hash:       {embedded_hash.hex()}")
print(f"SHA256 Hash rootfs:       {hashlib.sha256(rootfs_data).hexdigest()}")

with open("aes_key.bin", "wb") as f:
   f.write(payload_key)
with open("aes_iv.bin", "wb") as f:
   f.write(payload_iv)
The script output confirms data integrity — the hashes match.
$ python step_2.py

----------------------------------------

PAYLOAD KEY (Hex): 003de30f5928159d5824c6031d66756317b053240588a86830a14d4c62eb3290

PAYLOAD IV  (Hex): 1609010a35a4b8a9f97aa7f0b15f1a11

----------------------------------------

SHA256 Hash:       73b6197ce681dc70b696d2bbd79583c35cc73a765f839ed562a0d54307525a6a

SHA256 Hash rootfs:       73b6197ce681dc70b696d2bbd79583c35cc73a765f839ed562a0d54307525a6a
We have successfully extracted aes_key.bin and aes_iv.bin. All that remains is to apply standard AES-256 and obtain the filesystem, but here Fortinet has prepared a final trap.
VI. Custom cryptography and rootfs decryption.
At first glance, fgt_verify_decrypt looks like it uses AES in ECB mode, but a closer look at the decryption logic shows that it is used to generate a keystream, not to decrypt rootfs directly.
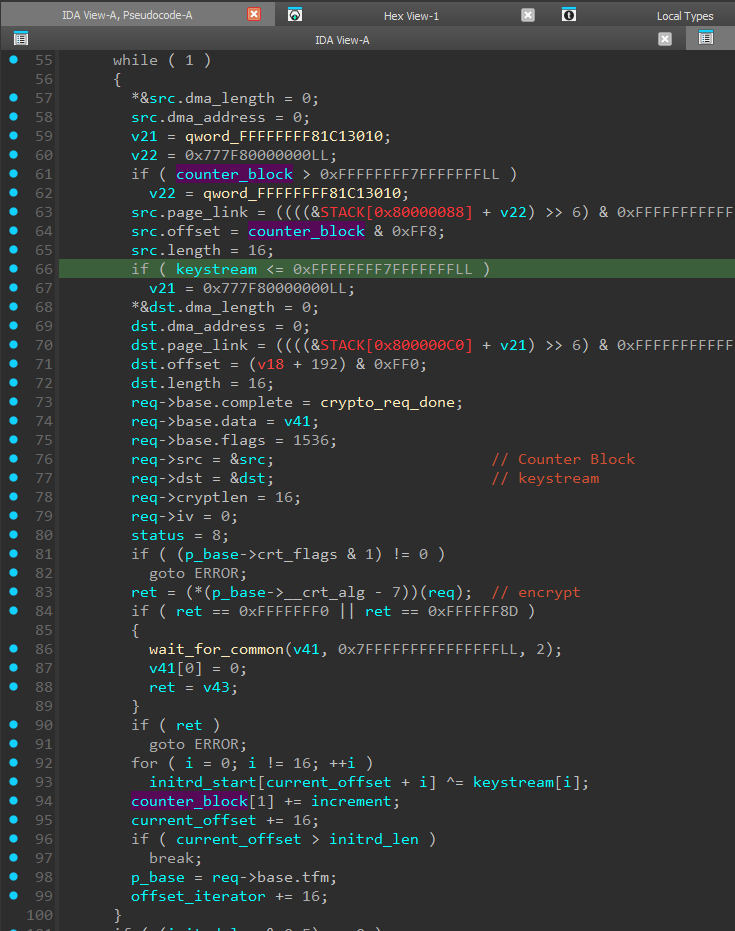
In other words, the algorithm used here is AES-CTR, which typically relies on a “Counter Block” that is encrypted with AES-ECB (line 83) to produce the keystream, and then XOR is performed between the ciphertext block and the keystream (lines 92–93).
For decryption we can use openssl, after first cutting off the last 256 bytes of the rootfs.gz file.
$ openssl enc -d -aes-256-ctr -in rootfs_enc.bin
-out rootfs_decrypted.gz
-K 003de30f5928159d5824c6031d66756317b053240588a86830a14d4c62eb3290
-iv 1609010a35a4b8a9f97aa7f0b15f1a11

$ file rootfs_decrypted.gz
rootfs_decrypted.gz: XZ compressed data, checksum CRC32

$ xz -d rootfs_decrypted.gz
xz: rootfs_decrypted.gz: Compressed data is corrupt
So, we obtained an XZ archive. It would seem that unpacking it should be enough to access the firmware files inside, but instead we got an error message.
On closer inspection of the fgt_verify_decrypt algorithm, we noticed a very important deviation from the standard scheme. In standard AES-CTR, after encrypting the Counter Block (to obtain the keystream), it is incremented by one. This is required for the next block so that the keystream is always different. Here, however, a custom algorithm is implemented to dynamically compute the increment based on AES_IV extracted from the digital signature. Because of this, the first data block was decrypted correctly (since the initial Counter Block value matches the standard AES-CTR implementation), and the file utility was able to correctly identify the file format.
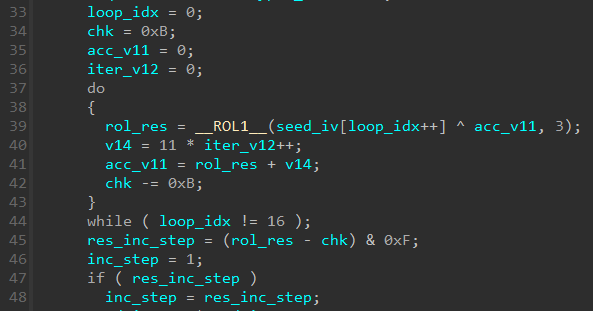
There is little point in analyzing this algorithm in depth; the only thing worth noting is that the resulting increment will fall in the range** from 1 to 15** (line 45). Therefore, for the final decryption we either need to implement the counter-increment calculation in Python, or brute-force all possible increment values. We chose the first approach, but even the second one finishes in a reasonable time — about 2–3 minutes.
import struct
from Crypto.Cipher import AES


def rol1(val, n):
   return ((val << n) & 0xFF) | (val >> (8 - n))


def calculate_increment_c_style(iv_bytes):
   data = list(iv_bytes)
   chk = 11
   acc_v11 = 0
   iter_v12 = 0

   for i in range(16):
       xor_val = (data[i] ^ (acc_v11 & 0xFF)) & 0xFF
       rol_res = rol1(xor_val, 3)

       v14 = (11 * iter_v12) & 0xFFFFFFFF  # 32-bit int
       iter_v12 += 1
       acc_v11 = (rol_res + v14) & 0xFFFFFFFF
       chk = (chk - 11) & 0xFFFFFFFF

   res_inc_step = (rol_res - chk) & 0xF
   return res_inc_step if res_inc_step != 0 else 1

with open("aes_key.bin", "rb") as f:
   key = f.read()
with open("aes_iv.bin", "rb") as f:
   iv_bytes = f.read()
with open("rootfs.gz", "rb") as f:
   raw_data = f.read()s
   ciphertext = raw_data[:-256]

increment = calculate_increment_c_style(iv_bytes)

cipher = AES.new(key, AES.MODE_ECB)

iv_low = struct.unpack("<Q", iv_bytes[:8])[0]
iv_high = struct.unpack("<Q", iv_bytes[8:])[0]

print(f"iv_bytes: {iv_bytes}")
print(f"INCREMENT: {increment}")

output = bytearray()
total_len = len(ciphertext)
num_blocks = (total_len + 15) // 16

curr_iv_high = iv_high

for i in range(num_blocks):
   block_in = struct.pack("<Q", iv_low) + struct.pack("<Q", curr_iv_high)
   ks = cipher.encrypt(block_in)

   chunk = ciphertext[i * 16: (i + 1) * 16]
   for j in range(len(chunk)):
       output.append(chunk[j] ^ ks[j])

   # Update IV
   curr_iv_high = (curr_iv_high + increment) & 0xFFFFFFFFFFFFFFFF
with open("rootfs_decrypted.xz", "wb") as f:
   f.write(output)
As a result, we obtain the rootfs_decrypted.xz file:
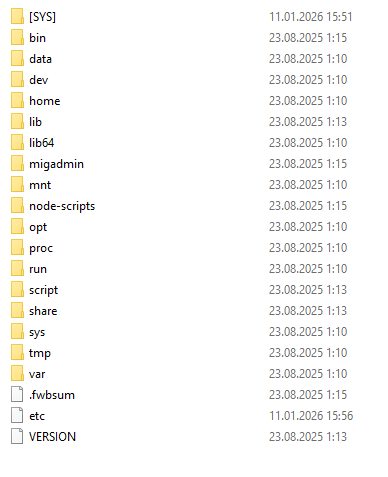
$ xz -d rootfs_decrypted.xz

$ file rootfs_decrypted
rootfs_decrypted: Linux rev 1.0 ext4 filesystem data, UUID=ffb6851c-a619-49f4-9181-8a6fef23f6b4 (extents) (64bit) (large files) (huge files)
The resulting filesystem image can be mounted or unpacked in the same way as boot.qcow2 from the beginning of the article.
VII. Conclusion
In this research we went from analyzing the kernel binary to fully decrypting the Fortinet device filesystem. The process showed that the vendor actively applies the “Security by Obscurity” concept, building defense in multiple layers:
- Key obfuscation: The RSA public key is not stored in plaintext; it is hidden using ChaCha20, with parameters generated dynamically from static data in memory.
- Non-standard crypto container: Using RSA-KEM with a proprietary data structure instead of a standard signature makes it impossible to rely on common analysis tools and libraries.
- Algorithm modifications: Changing the counter increment logic in AES-CTR breaks compatibility with standard AES implementations, forcing the researcher to deeply analyze the keystream-generation algorithm.
Such modifications significantly complicate the initial analysis and filter out automated scanners, but they do not provide cryptographic strength against a researcher who has access to the executable code (the kernel). Since the device must be able to decrypt its own filesystem in order to boot, the algorithm and keys are inevitably present in the system.